milk drinks
How to Steam Milk: A Home Barista's Microfoam Guide

To steam milk, briefly introduce air near the surface with your steam wand, then submerge the tip to texture the milk into silky, glossy microfoam. That two-step move, stretch then texture, is the whole game. I’ve done it every morning for years, and once the muscle memory clicks, it takes about 15 seconds. Below I’ll walk you through the wand technique, temperature targets, milk choices, and a few no-wand alternatives that still get you close.
Key Takeaways
- Steaming has two phases: stretch (add air) first, then texture (roll the milk) to break bubbles into fine microfoam.
- Aim for roughly 140-150°F, when the pitcher gets too hot to hold for about three seconds. Never push past 160°F.
- Whole milk textures easiest thanks to its fat and protein; barista oat is the best plant-based swap.
- Microfoam is silky and pourable for latte art; stiff dry foam suits a classic cappuccino.
- No steam wand? A French press, handheld frother, or jar-and-microwave method gets you passable foam.
What Does It Mean to Steam Milk?
Steaming milk means using pressurized steam from an espresso machine wand to simultaneously heat the milk and fold in tiny air bubbles. The result is warm, sweet, textured milk with a paint-like sheen. It’s the foundation of every espresso-based milk drink, from a flat white to a cappuccino.
Heat matters as much as texture here. Warming milk gently draws out its natural sweetness, because the lactose becomes more perceptible as proteins unfold. Push the temperature too high and you cook those proteins, which is where that unpleasant scalded, eggy taste comes from. So steaming is really a balancing act: enough air, enough heat, no more.
The steam wand does two jobs in quick succession. First it stretches the milk by injecting air. Then it spins the milk to distribute and refine that air into microfoam. Master that sequence and everything else, latte, cappuccino, cortado, becomes a matter of ratio.
Steaming vs. Frothing: What’s the Difference?
People use these words interchangeably, but they aren’t the same. Steaming heats and textures milk into integrated microfoam using pressurized steam. Frothing usually means whipping air into milk, often cold or separately warmed, to create foam that sits on top rather than blending through. The texture goal is different, and so is the gear.
Frothing tends to produce lighter, drier, more separated foam. Think of the fluffy cap on a diner cappuccino or the airy layer from a battery-powered wand whisk. It’s great when you want a distinct foam layer, and I lean on it for cold foam on iced drinks.
Steaming, by contrast, weaves the air into the milk so the whole thing pours as one glossy liquid. That integration is what makes latte art possible. If you want a deeper comparison of the tools and methods, our guide on how to froth milk breaks down each option side by side.
In my experience the real dividing line isn’t the machine, it’s whether the foam is part of the milk or floating on it. Steam integrates. Most frothing separates.
How Do You Steam Milk With a Steam Wand?
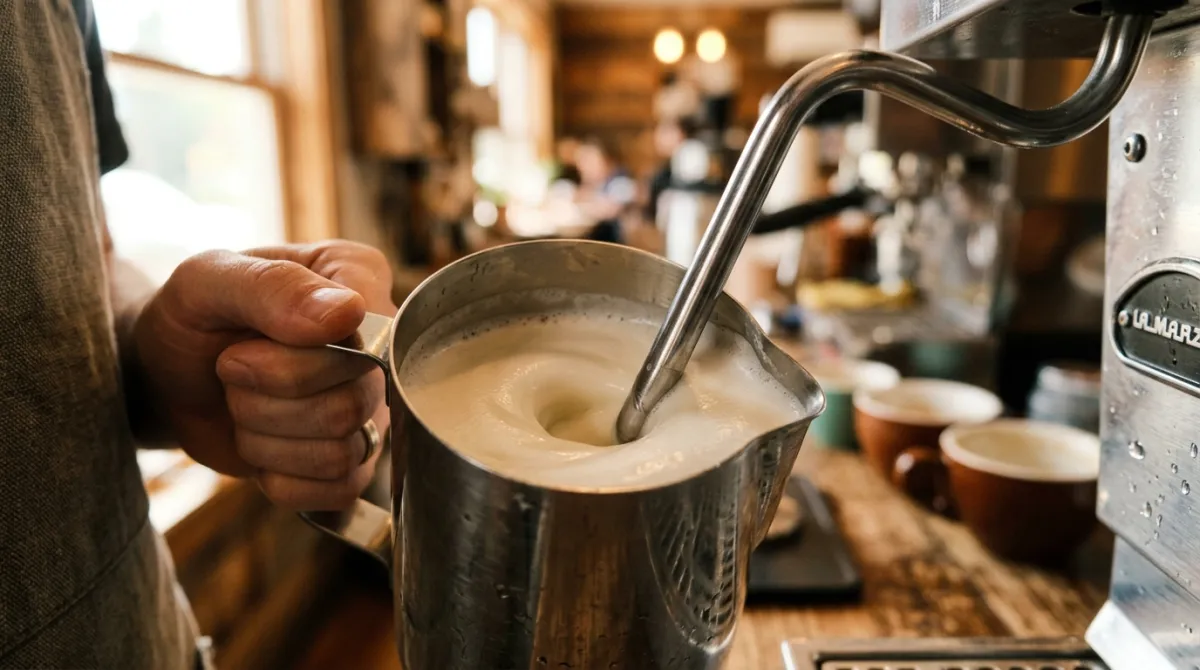
Steaming with a wand comes down to five steps: purge, position, stretch, texture, and finish. Start with cold milk in a cold stainless steel pitcher, filled to just below the spout base. Cold milk gives you a longer working window before it overheats, which matters most while you’re still learning the feel.
Step 1: Purge and Position
Purge the wand first. Open the steam valve for a second or two to blow out any condensed water sitting in the tip, then wipe it. Now angle the pitcher slightly and submerge the wand tip just under the surface, off-center, so it’s pointed to create a swirl rather than straight down.
Step 2: Stretch (Add the Air)
Open the steam full blast. Keep the tip near the surface so it makes a gentle, rhythmic tsch-tsch hissing sound. Each hiss is a small bite of air entering the milk. This is stretching, and it’s where volume and foam are born. For a latte you want just a few seconds of this; for a cappuccino, longer.
Here’s the part people get wrong. As the milk rises, drop the pitcher slightly so the tip stays right at the surface. Stop adding air once the milk has grown by roughly a third for foamy drinks, or barely at all for a flat white.
Step 3: Texture (Roll the Milk)
Now submerge the tip a little deeper to kill the hissing. The goal is a smooth, tornado-like vortex spinning the milk around. That spin is texturing: it grabs the big bubbles you just made and shears them into fine microfoam. Keep it rolling until the surface looks glossy and paint-like, with no visible large bubbles.
Step 4: Hit Temperature, Then Finish
Rest your hand on the side of the pitcher. When it’s too hot to hold comfortably for about three seconds, you’re near 140-150°F and should stop. Close the steam, remove the pitcher, then purge and wipe the wand immediately. Give the pitcher a firm swirl and a tap on the counter to fold everything into one silky mass before pouring.
I burned a lot of milk early on because I chased the sound instead of the touch. Trusting my hand on the pitcher, not my ears, was the single biggest upgrade to my routine.
What Temperature Should Steamed Milk Reach?
Steamed milk tastes best in the 140-150°F range, warm and sweet without cooking the proteins. That window is where lactose sweetness peaks and the texture stays fluid enough to pour. Below about 130°F the drink feels lukewarm; above 160°F you start scalding, and the milk turns thin, flat, and faintly eggy.

If you don’t own a thermometer, the three-second hand test is reliable. Wrap your palm around the base of the pitcher during texturing. The moment you can’t keep it there for three full seconds, cut the steam. A cheap clip-on or infrared thermometer removes the guesswork entirely while you calibrate your feel.
One thing worth stressing: milk keeps warming for a beat after you stop, thanks to residual heat in the pitcher and steam. So I always cut the steam a couple of degrees early. Overshooting is unforgiving, because there’s no undoing scalded milk.
Which Milk Steams Best?
Whole dairy milk steams the most forgivingly, because its fat and protein work together to build stable, creamy microfoam. Fat carries flavor and softens the texture, while proteins trap and hold the air bubbles. That combination gives you a wide margin for error, which is exactly what a beginner wants.
Lower-fat milks foam faster and taller but feel thinner and drier, since there’s less fat to round things out. They can produce impressive volume for a cappuccino, yet the microfoam is less velvety. If latte art is your aim, whole milk simply behaves better under the wand.
The Best Plant-Based Options
Among non-dairy choices, barista-formulated oat milk is my go-to. These versions add stabilizers and a touch more fat or protein so they texture close to dairy. Standard oat, soy, and almond milks vary wildly; regular versions often split or foam poorly. Soy barista blends steam well too, though they can be temperature-sensitive and curdle if overheated. If you’re building drinks like a latte or a cappuccino, start with a barista edition and you’ll skip a lot of frustration.
Microfoam vs. Dry Foam: Which Do You Want?
Your foam target depends on the drink. Microfoam is the silky, wet, glossy texture with bubbles so small you can barely see them. It pours smoothly and integrates with espresso, which makes it ideal for lattes, flat whites, and any latte art. It should look and move like wet paint.

Dry foam, sometimes called stiff foam, is airier and holds its shape. It’s what tops a traditional cappuccino, sitting as a distinct cloud you can almost spoon. You build it by stretching longer, adding more air during that first phase, and texturing less.
The practical difference is stretch time. Short stretch equals microfoam. Long stretch equals dry foam. Everything else in your technique can stay the same, which is why one skill unlocks the whole menu.
Can You Steam Milk Without a Steam Wand?
Yes, several no-wand methods produce warm, foamy milk, though none match a wand’s integrated microfoam. The best budget option is a French press: heat milk to around 140°F on the stove or in the microwave, pour it in, and pump the plunger briskly for 20-30 seconds. You’ll get a solid foam suitable for cappuccino-style drinks.
A handheld electric frother is even simpler. Warm your milk first, then whisk with the frother until it doubles and looks foamy. It creates lighter, drier foam than a wand, so it’s better for foam-forward drinks than for pourable latte art.
The lowest-tech trick is the jar method: pour cold milk into a sealed jar, shake hard for 30-60 seconds, then microwave uncapped for about 30 seconds to set the foam. It’s imperfect but genuinely workable. For more on these approaches, our how to froth milk walkthrough covers each in detail.
Frequently asked questions
Why is my steamed milk full of big bubbles?
Big bubbles mean you added air for too long, or you never texturing the milk enough to break them down. Shorten the stretching phase, then keep the pitcher spinning in a tight vortex longer during texturing. A firm swirl and a couple of taps on the counter afterward also collapse stray large bubbles into a smoother finish.
How long does it take to steam milk?
For a single drink, steaming usually takes 15-25 seconds once your machine is up to pressure. Smaller volumes heat faster, so watch your temperature closely. Larger pitchers give you more working time but demand more steam power. With practice, the stretch and texture phases blend into one fluid motion that finishes before you overthink it.
Can you re-steam or reheat milk?
I don’t recommend re-steaming milk. Once milk has been heated and textured, its proteins have already changed, so a second round tends to produce thin, bubbly, flat-tasting foam that won’t hold. It can also scald easily. Steam only what you’ll use, and start fresh with cold milk each time for the best texture.
What size pitcher should I use?
Match the pitcher to your drink so the milk fills it about a third to halfway before steaming. A 12-ounce pitcher suits one drink; a 20-ounce handles two or a larger latte. Too much empty space makes swirling hard, while an overfull pitcher spills and can’t stretch properly, leaving you no room for foam to grow.
Steaming milk looks intimidating, but it’s really just two moves, add air, then roll it smooth, repeated until they’re second nature. Start with cold whole milk, trust your hand on the pitcher for temperature, and give yourself a few wasted batches to find the rhythm. Once it clicks, you’ll never look at a café drink the same way. For more techniques and recipes, browse our more brewing guides.
Keep brewing
Dial in your next cup with Brew Better Co.
Tested ratios, methods, and gear notes from a real home kitchen. New guides added regularly.
Explore all guides